Using Lightroom and Photoshop Masking Techniques to Create Epic Images
I have to start this feature with a sincere apology.A previous photography tutorial casually mentioned my use of Lightroom and Photoshop masking techniques.I use them quite often to create effects in my finished images.I assumed that my audience understood the basic mechanics of this technique.However I found out otherwise.
I received many requests to describe the process in greater detail.Specifically, when I employ the technique?Why? Especially HOW?Consequently this post; where I hope to address all of those queries.
Disclaimer
This feature is intended for professional photographers and serious enthusiasts.Lightroom and Photoshop masking is a sophisticated technique.It goes far beyond the scope of what the casual photographer would want to learn.Well beyond the lengths that they would go to create fantastic imagery.Surprisingly, some professional photographers won’t go through the process I’m about to describe.
The post-processing workflow I’m about to describe honestly takes 15-20 minutes to complete.Yes.Twenty minutes.For one image.Undeniably photographers that undertake assignments that involve capturing voluminous images simply can’t devote that much time to single images.Wedding photographers and professional sports photographers come to mind.
The Money Shot
But some shots are worth the effort.When your finished image is going to be displayed across a two page spread in a magazine.If the image will be presented in a large format.Particularly as a piece of framed fine art.If the image is destined for a photographic contest or competition.Certainly if the image is predesigned for billboard display.
Unquestionably if the image becomes a “signature” piece.That’s the image we’re going to work on in this tutorial.The image that appears on the home page of the Roadcraft USA website.One of my signature images.Let’s get started.
Getting It Right In The Camera
I’ve said it before and I’ll say it again.Photoshop is not a Band-Aid for poor photographic technique.You have to give your editing software the right materials to work with.The camera original RAW image needs to be as perfect as possible.This means no severely overexposed highlights and no seriously underexposed shadow areas.
Unquestionably the finest digital cameras ever made are at the photographer’s disposal these days.For this image I pulled the Nikon Z6II mirrorless camera out of my bag.The dynamic range of this camera amazes me.Its ability to simultaneously record detail in bright highlights and deep shadows is astounding.
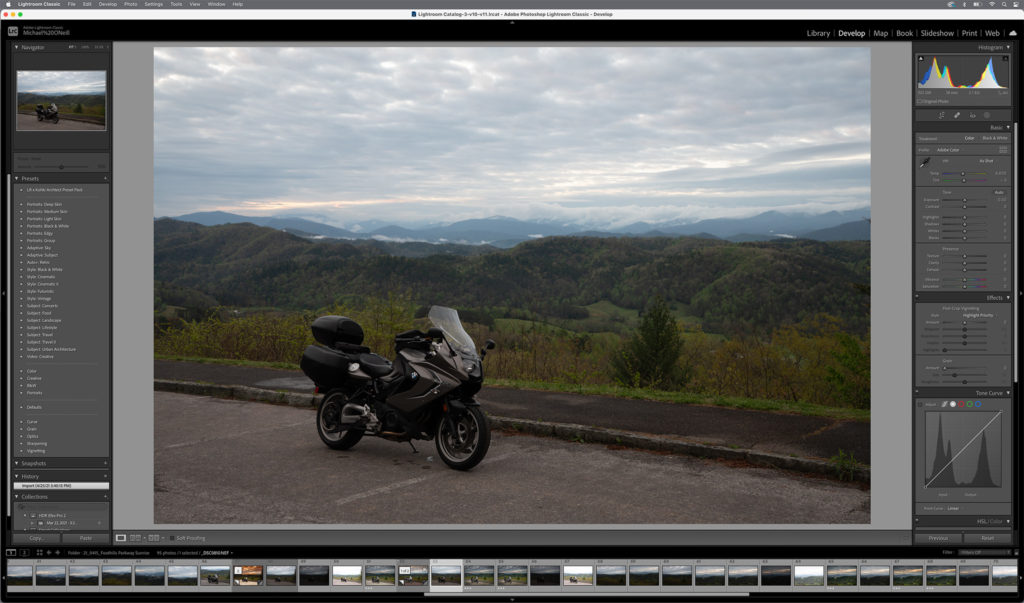
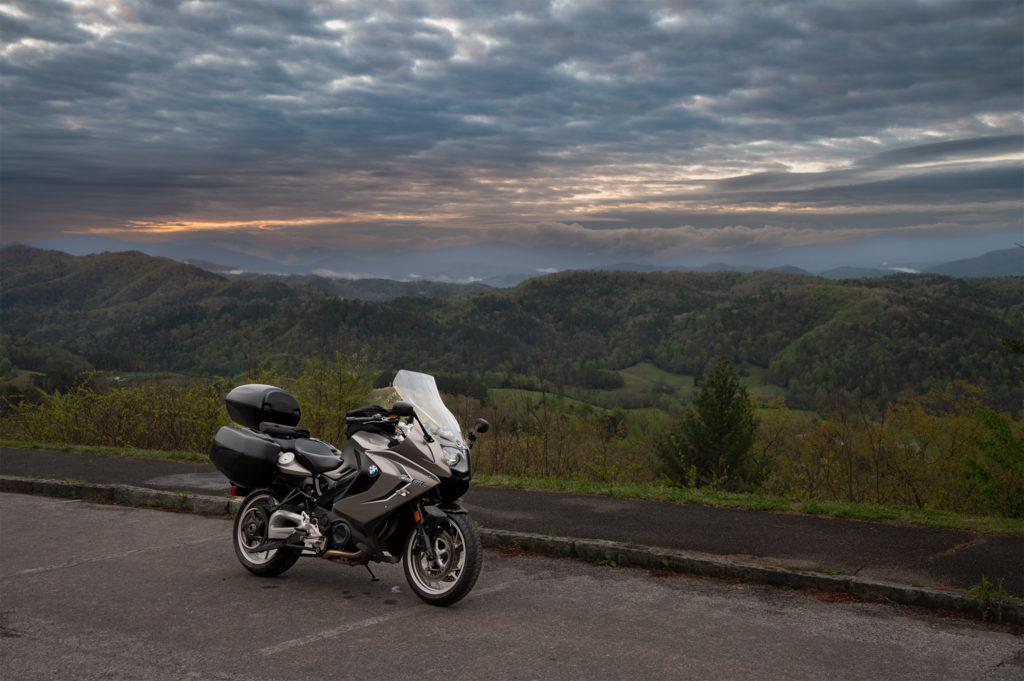
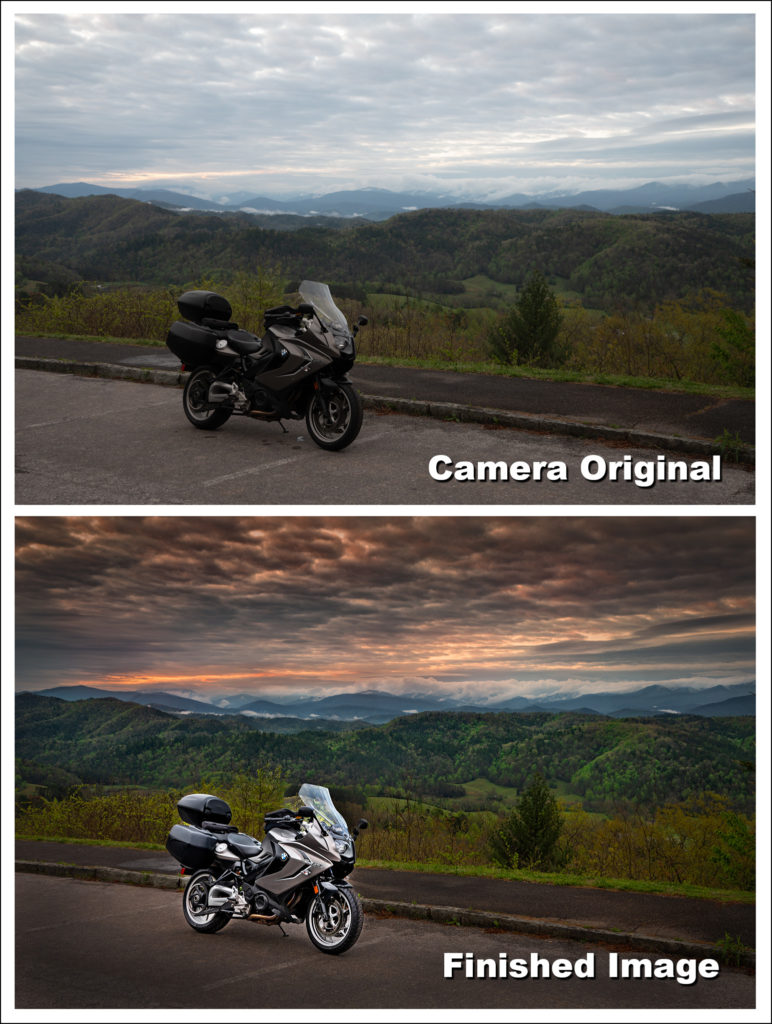
In the image above you see the original photographic capture.Looks a bit dull, don’t you think?Perhaps.But I see a whole lot of potential in that scene.It will certainly benefit by the use of Lightroom and Photoshop masking techniques.
The overcast conditions create nice even light over the entire landscape.This makes for large diffused highlights across the subject motorcycle.The kind of illumination that would require large bank lights/soft boxes in a photo studio.I see great cloud formations in the sky.
A look at the RAW image histogram below confirms a near perfect exposure.Significantly there have been no adjustments made.This is how the image came out of the camera.Shadow areas have detail and never fall to pure D-max black.Highlights that reach the top of the scale without any peaks moving into overexposure.It doesn’t get much better than this in-camera.
Multiple Lightroom Masking Capabilities
Adobe Lightroom was introduced in 2006.At that time it was primarily an application that allowed photographers to sort and catalog images.Thus its desktop interface which closely resembles the light tables that photographers used to lay their film transparencies on.
Thereafter Lightroom grew into a very powerful image editing tool.Photoshop and Lightroom masking capabilities weren’t offered until much later on.Today it offers a number of different masking tools.I’m going to demonstrate three of those tools herein.
Subject Masking Tool
This new feature in Lightroom is incredible!One click and truly complex masking is done for you automatically.Let’s hear it for Artificial Intellegence.In years gone by this kind of selection technique was extremely complex and very time consuming.AI has revolutionized Lightroom and Photoshop masking functions.
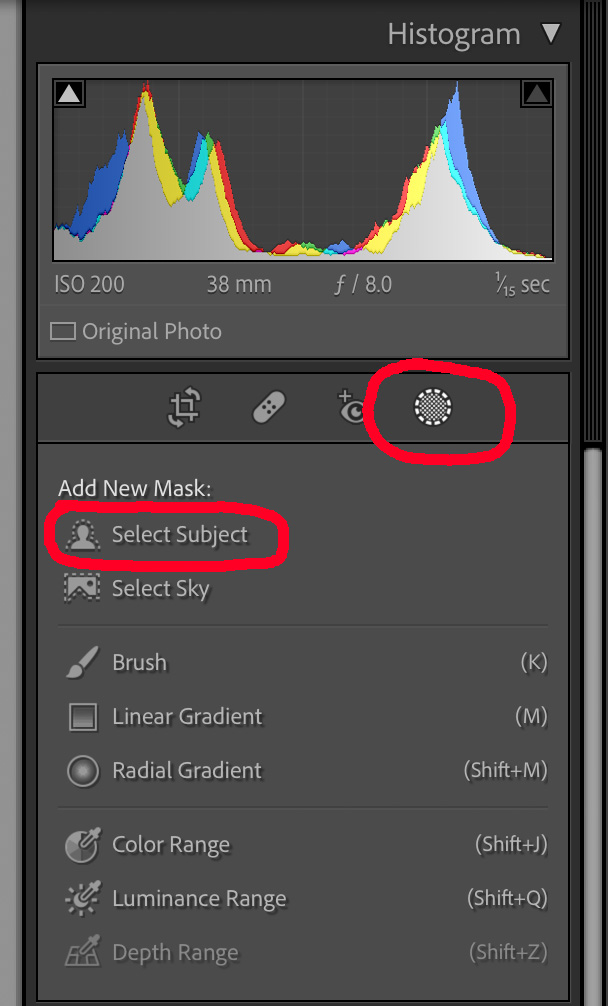
For this image I will use Lightroom’s Select Subject mask to isolate the motorcycle in the image.This is done by clicking on the mask icon and then clicking “Select Subject” in the dropdown menu as shown in the image below.
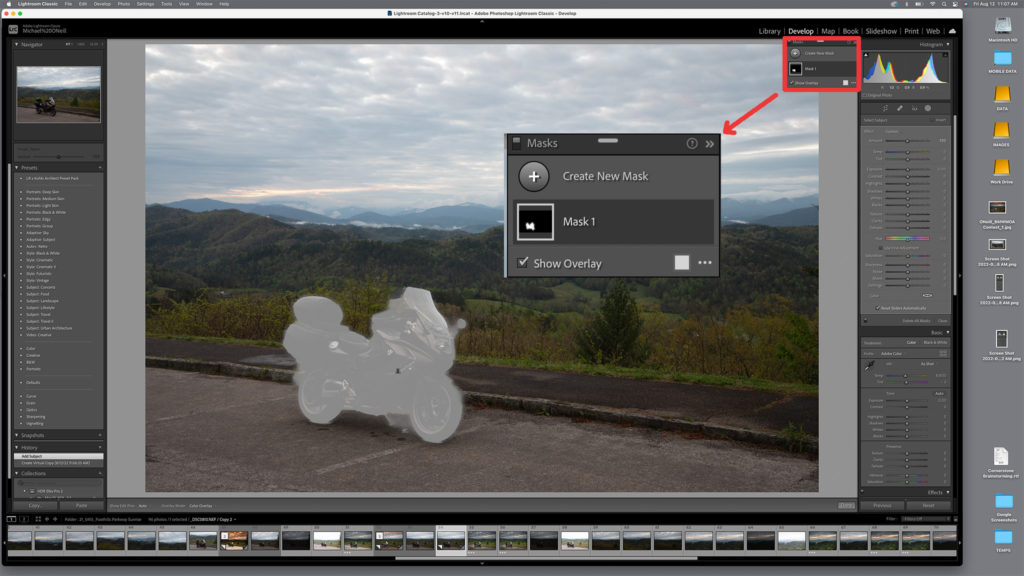
When I move my mouse over the subject Lightroom automatically detects and selects the motorcycle for masking as pictured below.
You’re now ready to apply your desired adjustments to the selected subject.The grey mask will disappear as soon as you adjust any slider.From there it’s a completely visual process.
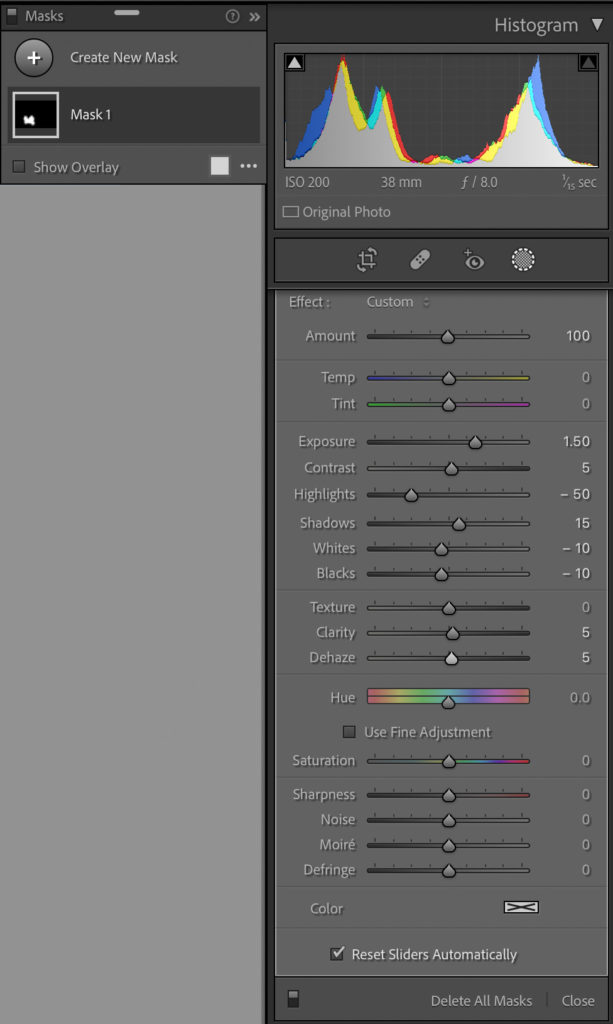
I chose to increase the exposure to brighten up the motorcycle.Following I added just a touch of contrast.Then I toned down the highlights which were amplified with the exposure increase.Shadows were pumped up a little bit to bring out the detail in darker areas of the subject.A touch of “Clarity” and “Dehaze” were added to help make the bike stand out.The adjustments made are shown in the image below.
Endless Possibilities
You’re not limited to a single masking option in Lightroom.You can add as many masks to your image as desired.Additionally, by creating virtual copies of your chosen RAW image, you can experiment with as many different masking possibilities as you want.
Currently we have our subject motorcycle looking the way we want it to.Let’s set our sights on the sky.Our goal is to add tremendous detail and drama to the clouds.
Sky Masking Tool
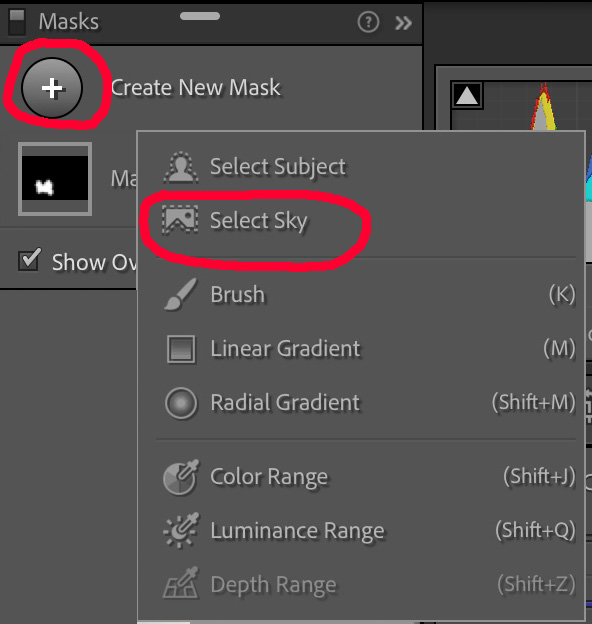
The first step to doing this is adding a new mask.In the mask palette pictured below you can see how this is done.Simply click on the “+” icon labeled “create new mask.”We’ll choose the option “select sky.”Through the miracle of AI the sky area will be detected and automatically masked.
The sky will become “greyed out” in the same fashion that the motorcycle was with our first mask.Similarly it will remain that way until any adjustments are made with the sliders.The adjustments I chose to make are shown in the image below.
I decreased the exposure by 3/4 of an f stop (-0.75).Then I added a good deal of contrast (+35).Thirdly I pulled back the highlights a tad (-5).In similar fashion I pumped up the shadows a bit (+10).Pulled back both the white and black levels (-15).Added a touch of clarity (+5) and a lot of dehaze (+20).Surprisingly we’re not done yet.We still have one more mask to add.
Radial Mask Tool
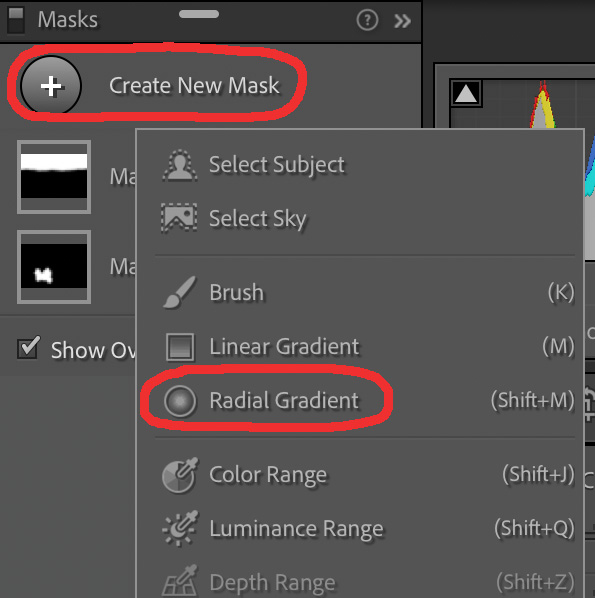
In like manner as above simply click on the “+” icon labeled “create new mask.”This time we choose the option “Radial Gradient.”You can see this option in the image below.You’ll also note the existence of the 2 previously created masks.They are being shown as thumbnails on the left side of the dialog box.
Why my decision to add a radial mask to this image?Because I want to intensify the little bit of the sunrise color that appears on the horizon.Whereas the previous selections made with the “Select Subject” and “Select Sky” commands were automatic, the radial selection is chosen by you.
By clicking and dragging you decide the size and shape of the mask.You also choose the amount of feathering you want around the edge of your mask.For this example I chose the midpoint of 50.
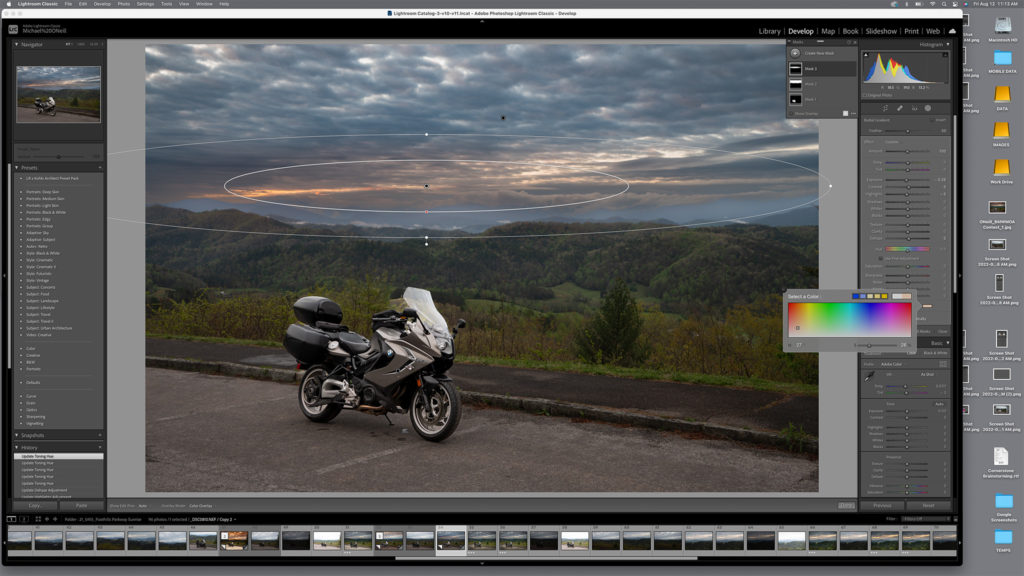
The image below shows the radial mask in the Lightroom interface.You’ll note I drew an oval-shaped mask.It was rotated ever-so-slightly counterclockwise.The two concentric ovals show the approximate 50% feathering of the selection.
A Touch Of Color
If you look closely at the above image you’ll note that I made no adjustments to this mask.No change in exposure.No contrast correction.No highlight compression.Nothing. Nada.This mask is all about adding a little color to that area of the sky.
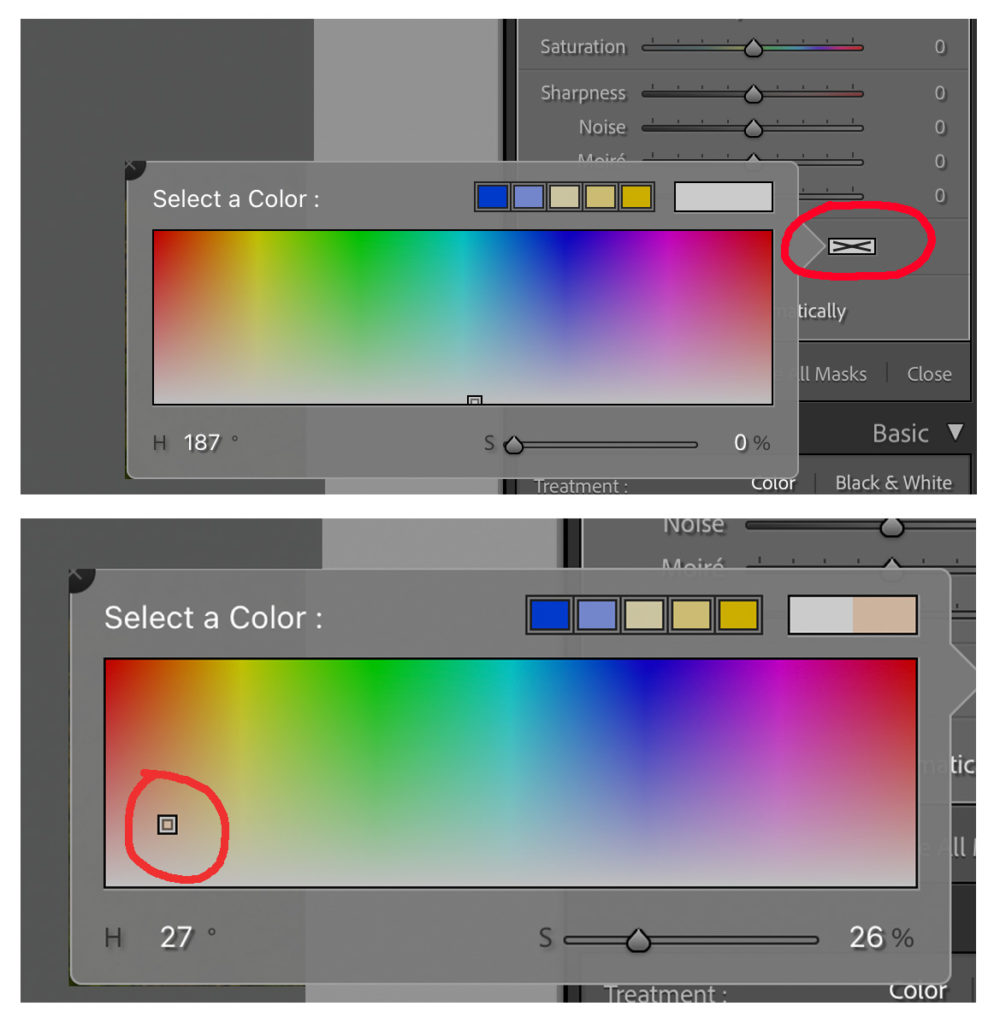
Click on the “Color” icon.It’s located in the lower right corner below the sliders and brings up the color select window.The “Color” icon is shown in the first image below.The second image shows the color I selected to add to the mask.A word of caution here.Go gently.Pick colors from the lower (less saturated) section of the color picker window.Go too high (saturated) and the effect will be unrealistically overdone.
That’s it for this image in Lightroom.We’ve added three masks and adjusted them towards reaching our final artistic vision.I export this image as a 16 bit TIFF file and send it off for some more work.This time in Photoshop.After all this is a feature about both Lightroom and Photoshop masking techniques.The image below shows you where we stand at this point.
In The NIK of Time
In a previous post I described my use of NIK Silver Efex Pro software.I use that application for converting my digital originals to finished black and white presentations.In this tutorial we’re going to use two more NIK products.NIK Color Efex Pro 4 and NIK Sharpener Pro 3.Like Silver Efex Pro these products work as standalone applications or as Photoshop plugins.For convenience and maximum versatility I choose to use them as Photoshop plugins.
As standalone applications the effects are applied globally to the entire image.You can use NIK’s proprietary U-Point technology to pinpoint where you want to apply effects.But using the NIK effects within Photoshop affords the maximum amount of flexibility and control.Because…masking.I introduce the NIK effects into my image as a separate layer.Therefore I am free to manipulate that layer by making an adjustment mask out of it.Let me show you how.
Selective Contrast
My objective is to make the clouds in this image as dramatic as possible, without looking unrealistic.To do this I want to first add some more contrast to the sky.Remember, we already added some contrast in Lightroom.However the NIK software provides for even more fine tuning to reach my desired result.
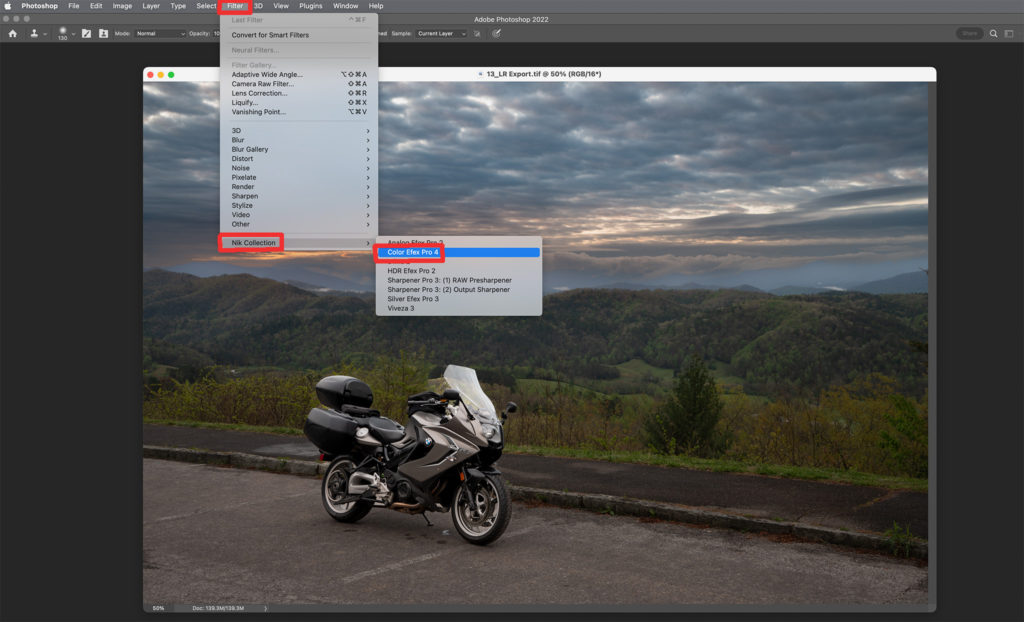
Start by selecting your entire image (Menu > Select > All).Then choose Filter > NIK Collection > Color Efex Pro 4 as shown in the image above.The NIK interface window will open up.I choose the Pro Contrast filter from the menu on the left side of the window.
Make Your Global Adjustments
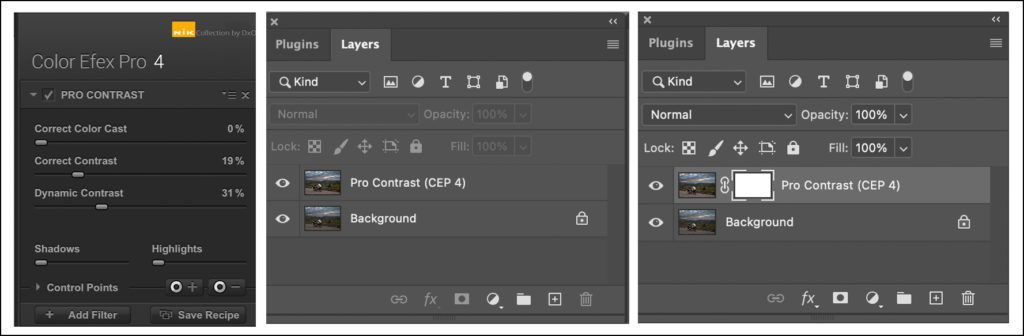
You’ll note in the image on the left below that I increase the “Correct Contrast” slider by 19%.I also increase the “Dynamic Contrast” by 31%.These adjustments are completely up to you.You see a large, full screen preview of the global effect instantly in the NIK interface window.
The increased contrast effect is being applied to the entire image.I focus my eyes on just the sky.That is where I want the adjustments to be made.When I have the effect I’m looking for I click “Apply.”The effect is applied to the entire image.The NIK interface window closes and you’re returned to Photoshop.
Take note of the center image above. The NIK Pro Contrast effect has been brought into Photoshop as its own individual layer.Click on that layer to highlight it. Then click the “add layer mask” icon.This converts the NIK Pro Contrast effect layer to a mask. This is shown in the image on the right above.
Paint Your Perfect Picture
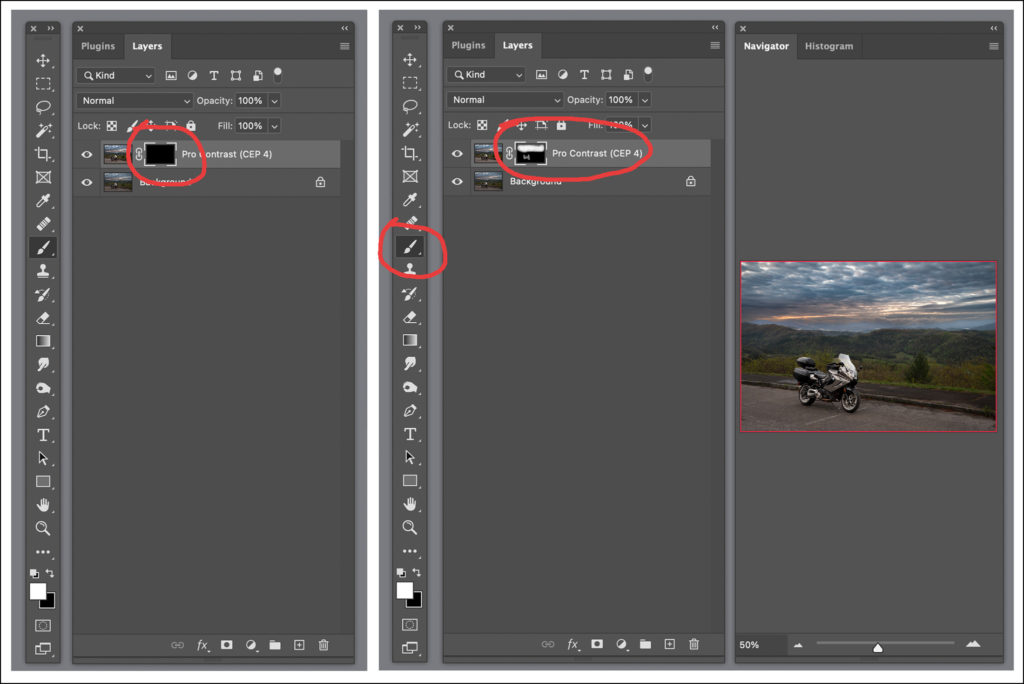
Invert the mask (keyboard shortcut Command i on Mac) and the real fun begins.This is where you apply your desired effect only where you want it.Only to the extent you want it.In the left side of the image below you see the NIK Pro Contrast layer as an inverted mask.
In the center image above you see that I have chosen the paint brush tool.I started to “paint” in the sky.In other words I am painting the NIK Pro Contrast effect only where I want it.In the sky.The thumbnail image in the navigator window on the right shows the effect.
When painting in effects such as this you can do so in a subtle fashion or boldly.This is regulated by adjusting the opacity of your brush.This opacity control is located at the top of the Photoshop window.I generally use a low opacity of 10-15%.I build up the effect gradually until it reaches the level I desire.Be sure to use a very soft edge on the brush for the smoothest painting results.
Sharpen Your Skills
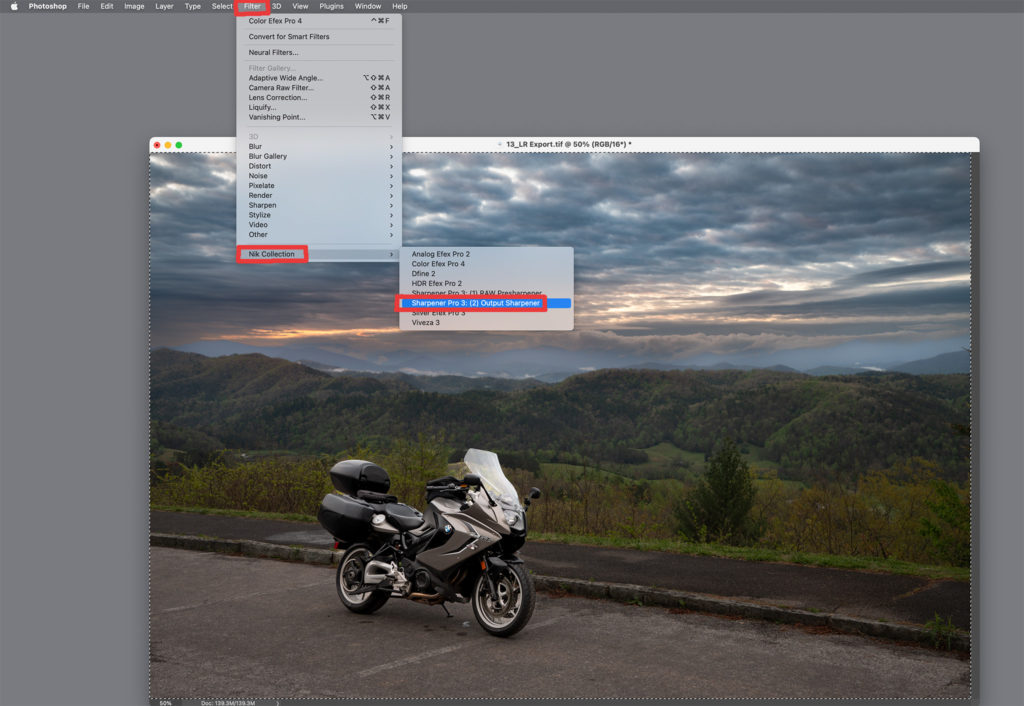
I now add some selective sharpening to the image.The NIK Sharpener Pro 3 is the best sharpening tool I’ve ever worked with.I use the “Output Sharpener” exclusively. Quite effective and near noiseless.A RAW Presharpener is part of the software package.I’ve never had occasion to use it.The image below shows the menu hierarchy followed to call up the sharpener.
The method of applying the NIK sharpening effect is exactly the same as the contrast effect we did previously.I bring the effect in globally on its own layer.The layer is converted to a mask and inverted.I paint the effect back in to the image exactly where I want it.
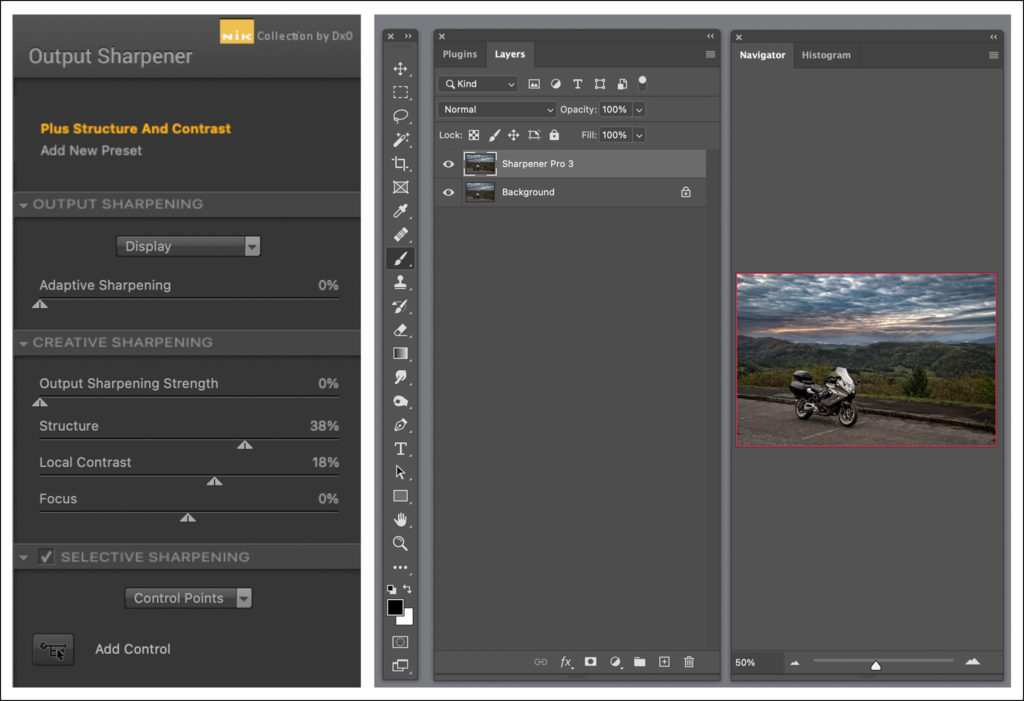
The image below shows the settings I generally use.“Adaptive Sharpening” and “Output Sharpening Strength” are ignored.I set “Structure” between 35 and 40%.Local Contrast is set to approximately 1/2 of the Structure value.The focus slider is ignored.
I paint I the sharpness I desire into the clouds.The defined edges of the clouds get more attention than the softer center portions.As a final tweak I make a few brush strokes over the motorcycle itself.This gives more definition to the decals, the logo and other sharp details.
The image above shows the sharpening mask layer after the final painting in of the sky and the motorcycle. The image is flattened and we continue on with our Lightroom and Photoshop masking efforts.
The Grass Can Always Be Greener
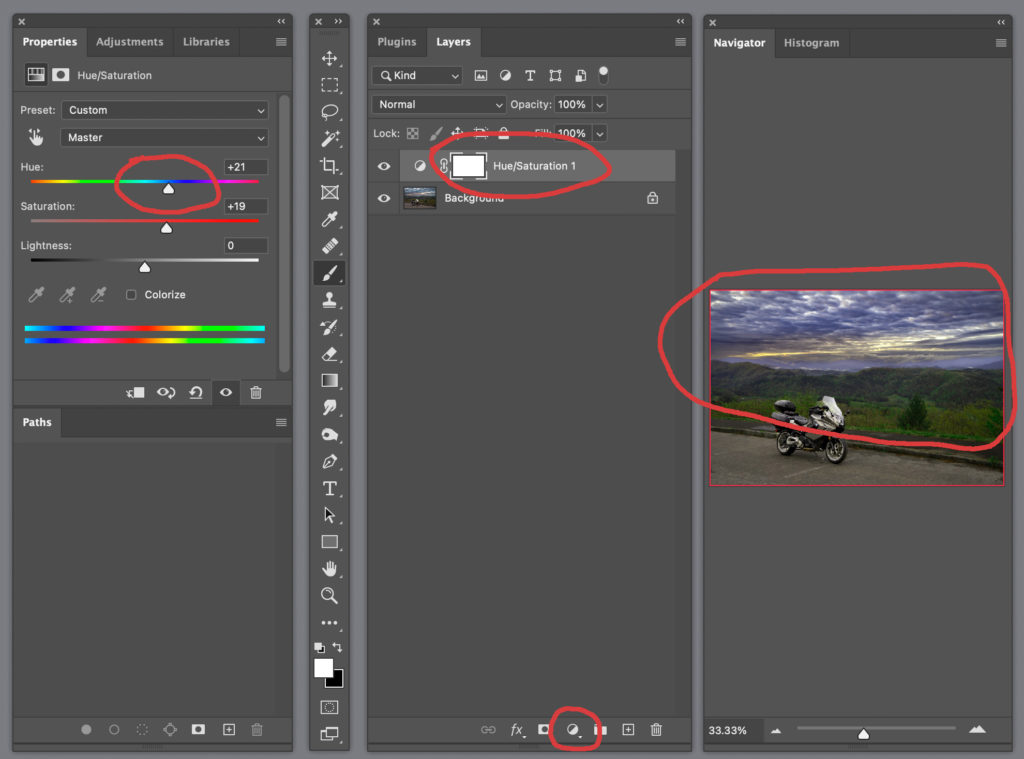
I look at the image as it stands.I decide that the foliage could be a little bit greener.This is a very quick fix using a masking layer in Photoshop.The image below shows the steps used to achieve this result.
I use the add mask function at the bottom of the Photoshop layers palette.Choosing the Hue/Saturation layer brings up a palette with controls for Hue, Saturation and Lightness. Moving the Hue slider to the right gives us all the depth and saturation we want in the green foliage.Simultaneously this makes the sky turn to a hideous purple shade.
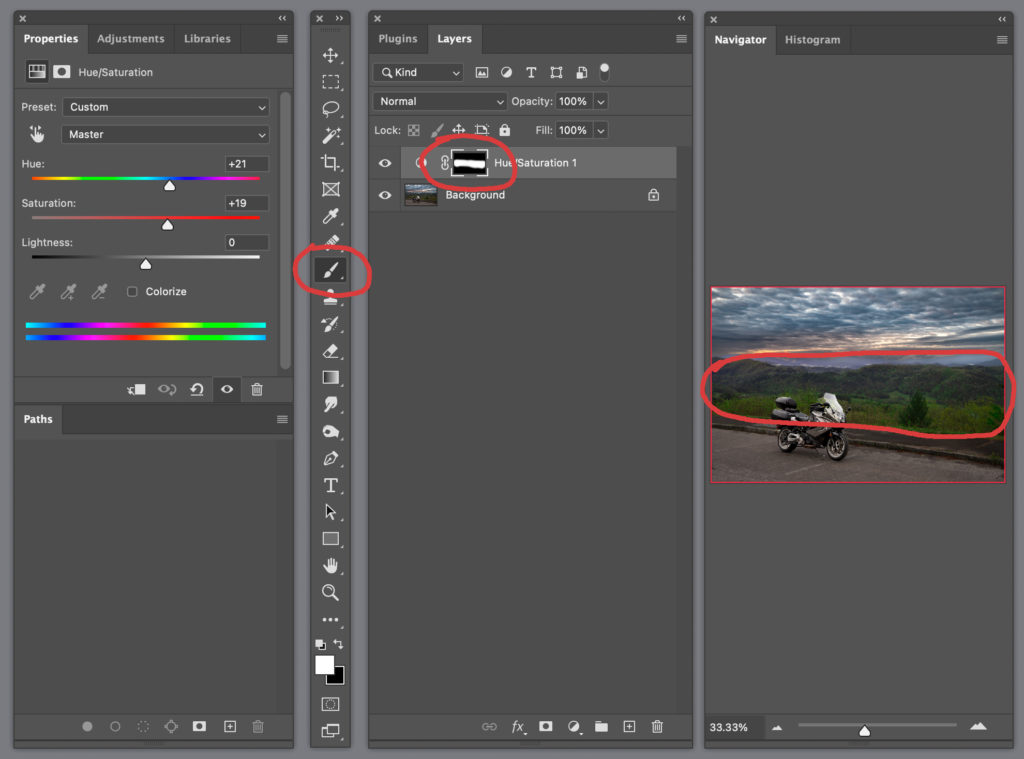
No worries.The change was made on a layer mask.Invert the mask and use the paintbrush tool to paint the nice green color back where it’s desired.The sky and foreground remain in their neutral color states.The tool choice and finished mask result is shown in the image below.
Bring On The Sunrise
Mother Nature provided me with a beautiful backdrop and wonderful cloud structure for this photograph.What she didn’t give me was the rich sunrise color I really wanted.Don’t despair.There’s an app for that.
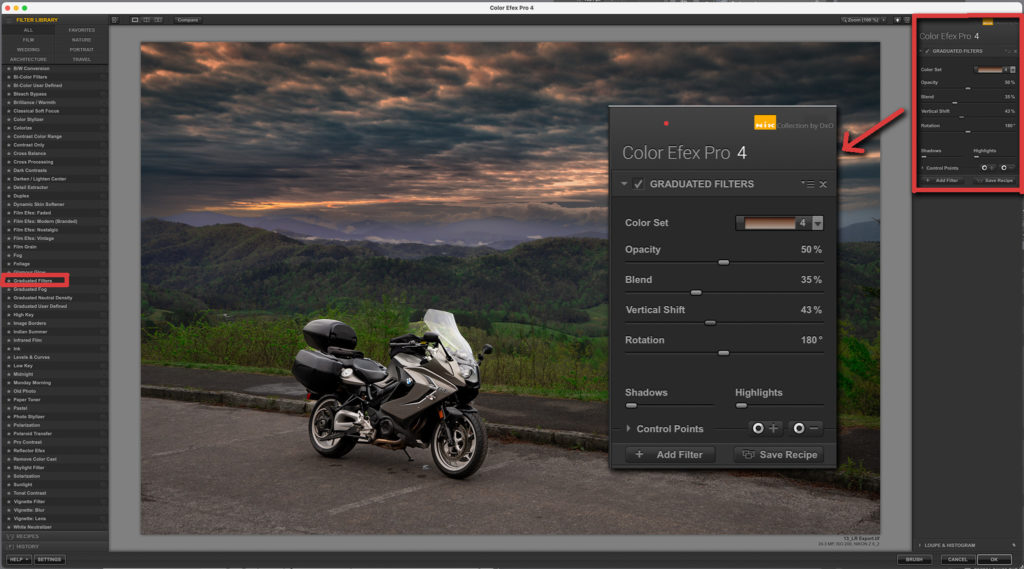
Built into the NIK Color Efex Pro software are a multitude of graduated filter options.In the image below you see the open NIK interface window.I have chosen the “Graduated Filters” option.From there a drop down “Color Set” menu is available.We choose a sort of bronze preset option and apply it globally to the entire image.You’ll note that adjustment can be made for the opacity of the effect.Further adjustment of blend, vertical shift and rotation allow you to position the effect where you want it.
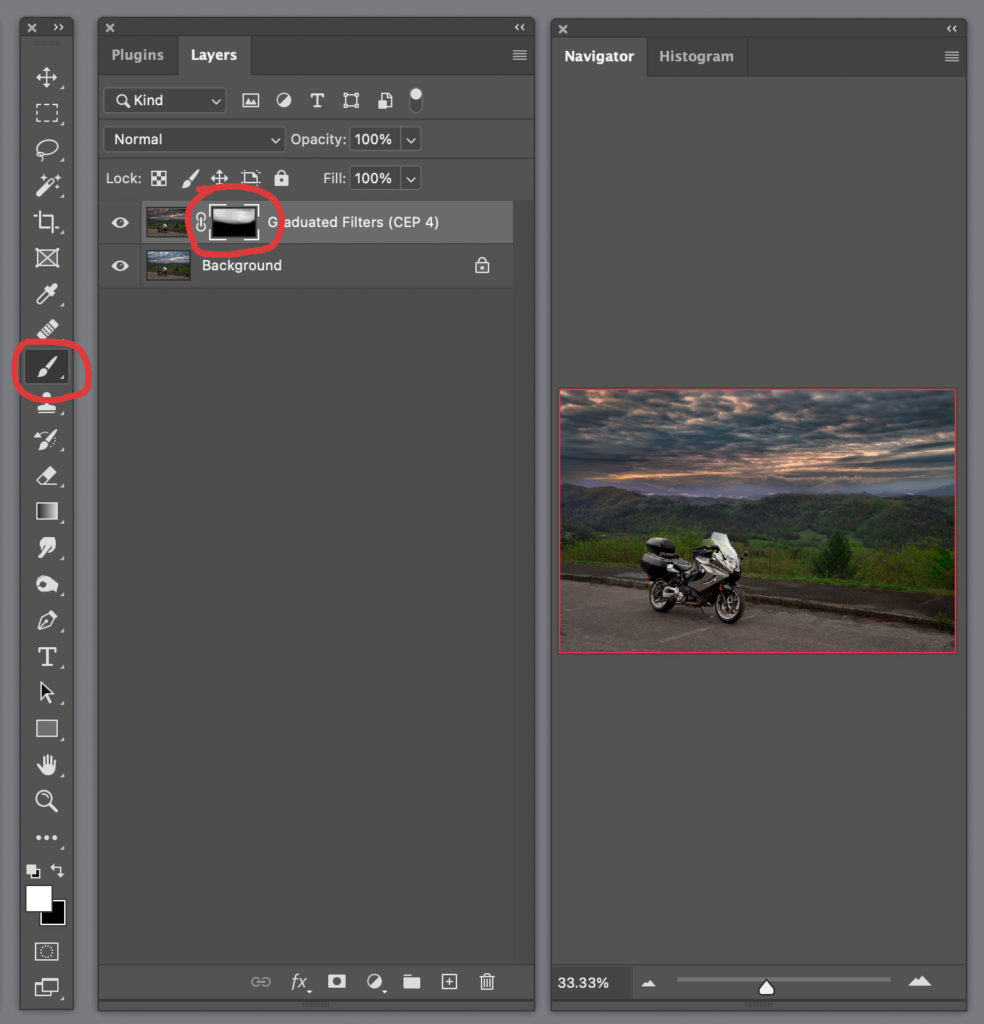
In keeping with our Lightroom and Photoshop masking workflow we convert the graduated filter layer to a mask.I choose to invert the mask again.Thereafter I use the paintbrush to render the graduated color back into the sky.In the image below you see the mask, the paintbrush tool choice and the finished result.
Final Tweaks
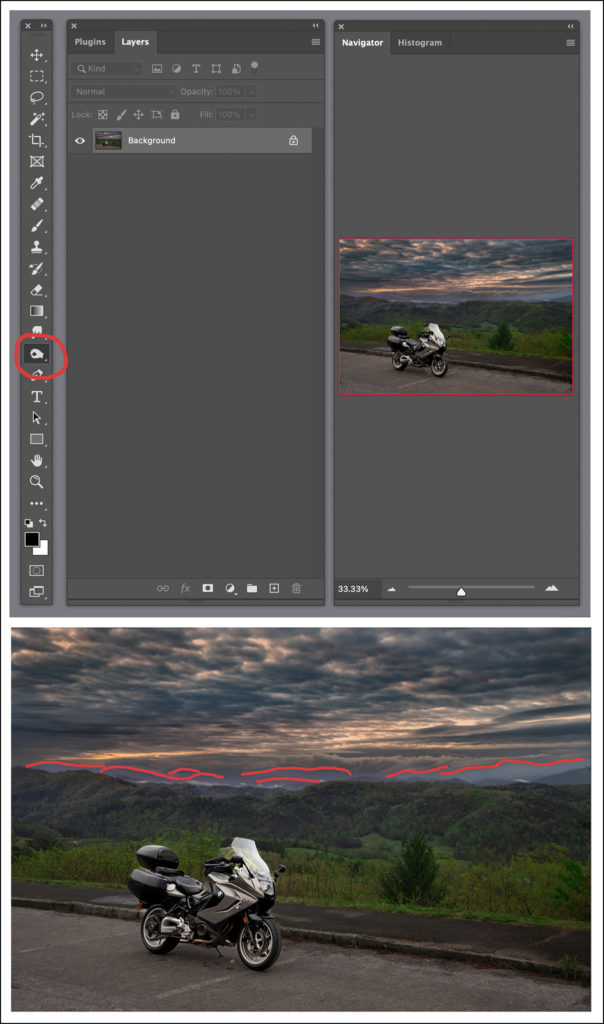
Two more quick touches will finish this image.First I want to add a bit of depth to the entire image.The mountain range pictured goes on for hundreds of miles.I want to amplify that feeling.This is accomplished by using the “Burn” tool in Photoshop.I choose a very small brush size and a very low opacity.Then I gently outline the top edges of the mountaintops in the distance.The tools used and the spots enhanced are shown in the image below.
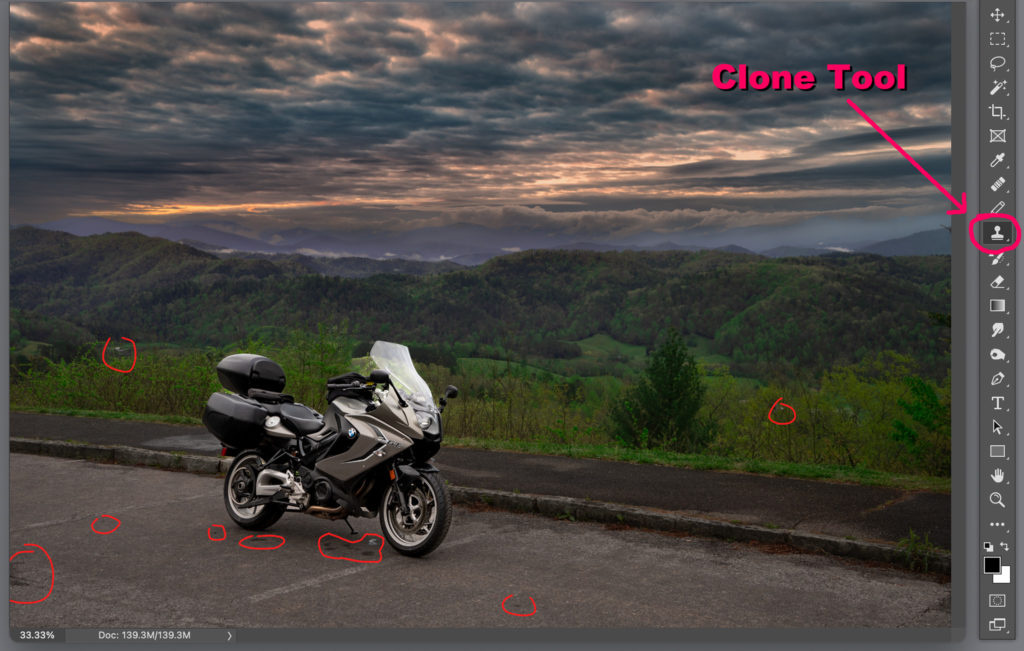
The last thing to do is the final clean up of the image.Stains on the pavement in the foreground, and a few spots in the background are eliminated.I use the clone tool to eliminate these distractions.They are pointed out in the image below.
A Place For Everything
As I have noted earlier it probably takes 15-20 minutes to complete all these steps.Was that too time consuming?Perhaps.It depends on what your finished image is worth to you or your client.
I am quite familiar with the demands of doing high volume work.As a wedding photographer I routinely shot 1,000+ images in a day.As a professional motorsports photographer that number rose to 4,000-5,000!There is no way you could put this amount of work into every single image you capture.Presets do have a place in the professional wedding and sports photographer’sdigital toolkits.
If I were still photographing 75 weddings per year I would have an extensive library of oft-used presets.They would be ones I designed by myself.They would reflect my personal style.They would not be the same “over-the-counter” presets that thousands of other photographers use.
It’s Not Just a Picture…It’s Your Vision
These days I’m a lot more selective about what I photograph…for whom, why and how.I have that luxury and try to make the most of it.I try to make every single image as good as it can possibly be.Very few images can’t benefit by the addition of some post-processing effort.
This tutorial was designed to show you some of the things you can do to your images.Particularly by employing Lightroom and Photoshop masking techniques.You certainly don’t have to go through ALL of these steps on ALL of your creations.This particular image simply lent itself to being the perfect subject for this tutorial.
Lightroom And Photoshop Masking Conclusion
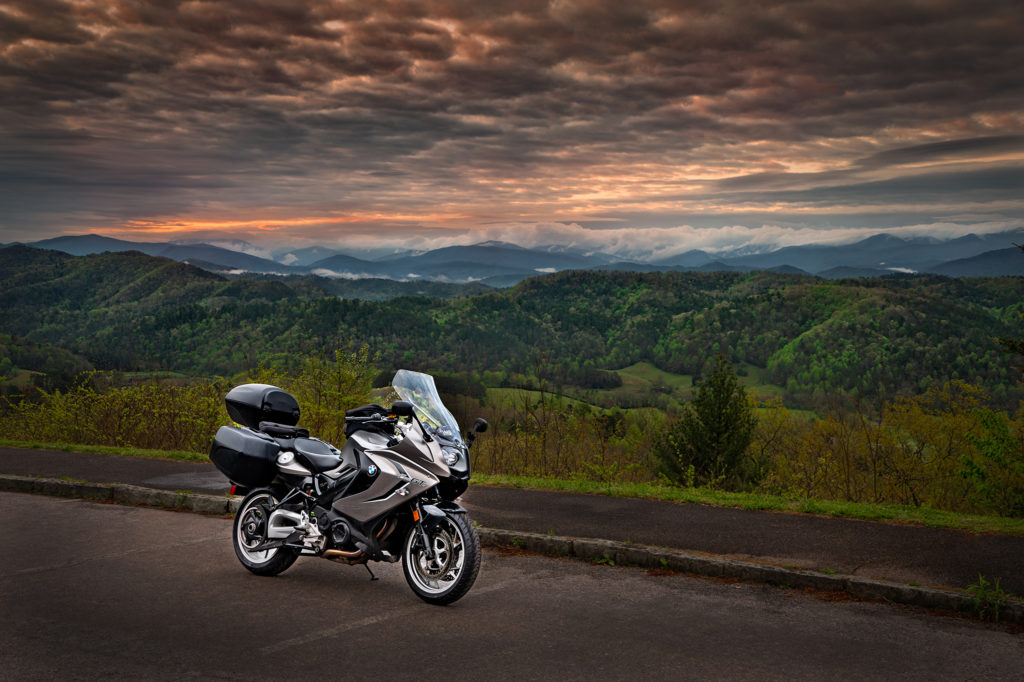
So here is the finished product displayed side by side with the camera original capture:
Was it worth the effort?I like to think so.It has become somewhat of a “signature image” for me.It is the first image you see when you visit the Roadcraft USA website home page.It was chosen as the winner of the Sunrise/Sunset photo contest held by BMW; earning a nice monetary award and a place on their 2023 calendar.It is also being displayed in an upcoming feature on the Nikon USA website.
What do you think of it?Feel free to leave your comments below.Be sure to subscribe to Roadcraft USA for notifications when future tutorials hit the blog.Now get out there and create some great imagery!
Please help support the Roadcraft USA online resource by making product purchases through the links in this post.As Amazon Associates we earn commissions from qualifying purchases made through these links.There is no additional cost to you whatsoever.Thank you for your support!
Click Here to view an interactive visual index page where you can quickly browse through all of the great features that are published on the Roadcraft USA blog.
4 thoughts on “SMOKY MOUNTAIN SUNRISE • HOW I GOT THE SHOT”
Vickie
Wow! your tutorial is amazing and so detailed! Your final image was totally worth the effort you put into it to enhance what you envisioned!
Just found your blog via the Nikon website. Always good to read another riders/photographers blog.
It’s a very nice tutorial you have put up and very in-depth. Your skills in editing are far better than mine are, that’s for sure.
What do I think of your image?
I think it looks a bit unnatural to be honest. It’s good don’t get me wrong, but I think the bike is over exposed and too bright for the surrounding scene, and the hills and the sky look slightly unnatural. I agree the RAW files always look flat, that’s just how they are as unprocessed files. I prefer to tone it down a little bit more than what you have an make it a little more natural looking. All up a great effort and good blog, I’ll be doing a bit more reading.
Hi Steve…Thanks for visiting Roadcraft USA and thanks for commenting. Your critique of the image is noted. Keep in mind this was a tutorial post and we wanted to expose the readers to as many different potential adjustment layer masks that we could. Is it overdone? Perhaps. An earlier (and less enhanced) version of the image graces the home page of the Roadcraft USA website. Another version won the BMW Motorcycle Owners of America “Sunrise/Sunset” photo competition and will grace the pages of their 2023 calendar. Yet another version is displayed on the “Photos From The Road” page of my personal website (https://www.michaeloneillfineart.com/photos-road). This version was chosen by NIKON because they thought it embodied the essence of their editorial: The Pursuit of Two Passions.
It’s all about interpretation, the client’s mission and the artist’s vision. What we hoped to convey in this tutorial is that the photographer can still bring their vision to fruition…even if Mother Nature did not bless them with ideal environmental conditions. Thanks again for reading and joining the conversation. Ride safe!


Wow! your tutorial is amazing and so detailed! Your final image was totally worth the effort you put into it to enhance what you envisioned!
Thanks Vickie. There are lots of other great tutorials on the site. There will be many more coming. Thanks for stopping by, reading and commenting
Just found your blog via the Nikon website. Always good to read another riders/photographers blog.
It’s a very nice tutorial you have put up and very in-depth. Your skills in editing are far better than mine are, that’s for sure.
What do I think of your image?
I think it looks a bit unnatural to be honest. It’s good don’t get me wrong, but I think the bike is over exposed and too bright for the surrounding scene, and the hills and the sky look slightly unnatural. I agree the RAW files always look flat, that’s just how they are as unprocessed files. I prefer to tone it down a little bit more than what you have an make it a little more natural looking. All up a great effort and good blog, I’ll be doing a bit more reading.
Hi Steve…Thanks for visiting Roadcraft USA and thanks for commenting. Your critique of the image is noted. Keep in mind this was a tutorial post and we wanted to expose the readers to as many different potential adjustment layer masks that we could. Is it overdone? Perhaps. An earlier (and less enhanced) version of the image graces the home page of the Roadcraft USA website. Another version won the BMW Motorcycle Owners of America “Sunrise/Sunset” photo competition and will grace the pages of their 2023 calendar. Yet another version is displayed on the “Photos From The Road” page of my personal website (https://www.michaeloneillfineart.com/photos-road). This version was chosen by NIKON because they thought it embodied the essence of their editorial: The Pursuit of Two Passions.
It’s all about interpretation, the client’s mission and the artist’s vision. What we hoped to convey in this tutorial is that the photographer can still bring their vision to fruition…even if Mother Nature did not bless them with ideal environmental conditions. Thanks again for reading and joining the conversation. Ride safe!