There is no denying that certain images simply lend themselves to being displayed in black and white (Which I’ll refer to hereafter as B&W to save on typing).One of the top subjects I’m asked about is what types of B&W image editing techniques I employ.What editing software I use?What presets do I favor?I’ll try to answer all of those questions in this “How I Got The Shot” tutorial.
Traveler’s Logistics • Photographer’s Equipment
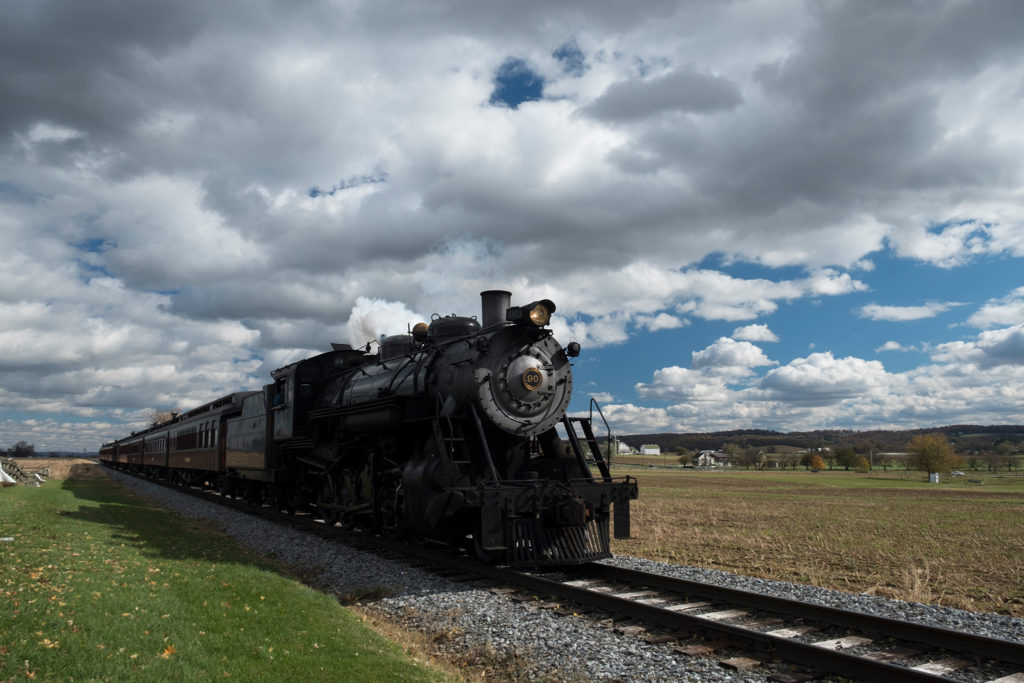
Many travelers will want to know all the details about how and where this image was created.That information was provided in a previous post about visiting the Amish Country in Pennsylvania.Click here to view that post, then scroll down to the images of the vintage trains.There’s lots of great info there on how to best position yourself to capture a photo of one of these iconic locomotives.
This image was captured in November of 2018 using a Nikon D4S DSLR camera.The camera was fitted with a Nikkor 24-70mm f2.8 G ED lens.The series of shots from which this frame was selected were made hand held at 1/250 sec;f/7.1; ISO 250.A circular polarizing filter was used on the lens to enhance the sky.There really is no substitute “digital filter” (software/preset) that can match the performance of a true optical filter.
Don’t Be Scared
This tutorial is going to be quite lengthy.I want to not only give you a creative workflow that you can follow, but I want you to understand every facet of why certain steps are being taken.The steps I’m about to describe honestly take me about 3-4 minutes to effect.With a little practice you’ll be producing dramatic B&W images just as quickly.
Read through this entire B&W image editing techniques tutorial to get a feel for what you’ll be doing and why.Then grab an image of your own and follow through the steps again; this time applying them to your image.You’re going to love the results.
The Capture Counts
As digital artists we have incredible software tools at our disposal.They enable us to to create the images that formerly existed only in our minds.These software solutions should be thought of as just that…Tools.Too many people look at programs like Adobe Lightroom, Photoshop and countless others as “Band Aids”… applications that can salvage a decent image from a far less-than-perfect capture.Don’t be that person.
Get it right in the camera.After that all your effort will be involved in perfecting your creation…not trying to get an acceptable image from a poorly executed original.I’ll be touching on some of the basics of digital capture in this tutorial.
Give It Your Best Shot
Give yourself the best possible advantage when you know you’re going to be employing some B&W image editing techniques.In a previous tutorial post I expressed a fundamental principle. It bears repeating here:
It is always better to underexpose a digital image than to overexpose.Period.End of discussion.Underexposed shadow areas in a photograph can be recovered in post processing.Overexposed highlights are gone forever.You should give some forethought to what it is that you will be photographing.
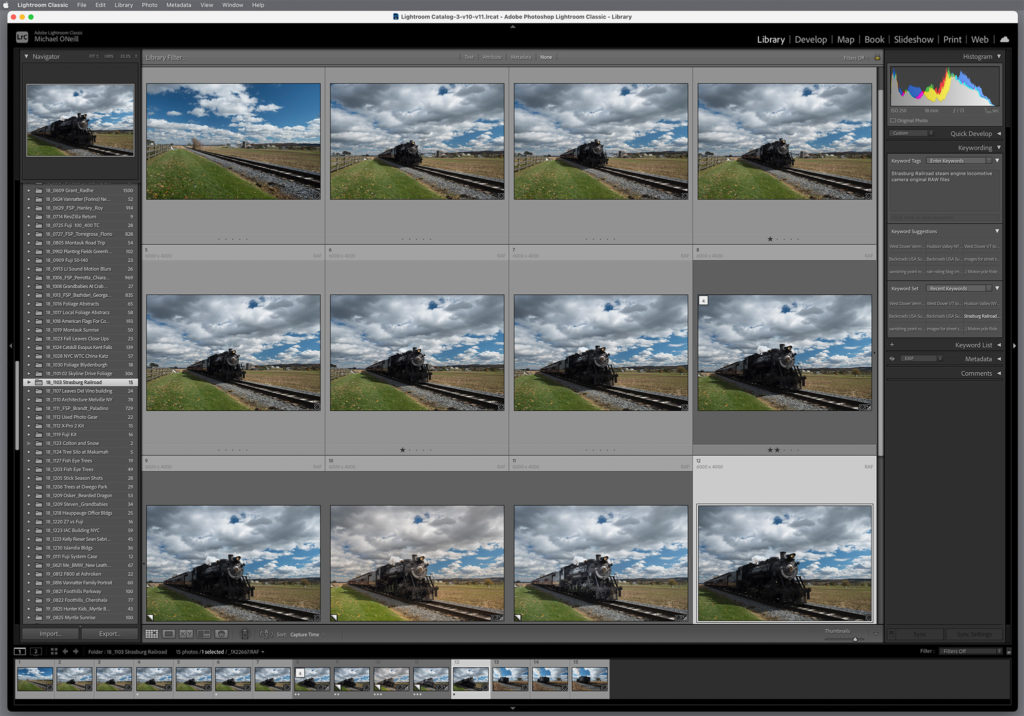
In the screen capture of the Adobe Lightroom Library Module (below) you can see that the individual exposures remained consistent regardless of how much of the image area was taken up by the dark train or the bright sky.That is because I used the manual exposure mode in the camera.You will never achieve this consistency shooting in any automatic exposure modes.
Take Full Control Of The Situation
In the example we’re using for this tutorial we have photographed a dark (black) steam locomotive against a bright sunny sky.Therefore I had manually set my camera to properly expose the white clouds in the open sky.I did not want to overexpose the clouds or the sky.They are an important component in the finished composition.
However the main subject…the train…was naturally going to be underexposed.It might seem counter-intuitive to expose for the background and not the main subject.You must keep in mind that you’ll be able to recover the underexposed areas of the image.You can never get back highlight details that were overexposed.
Presets? We Don’t Need No Stinkin’ Presets!
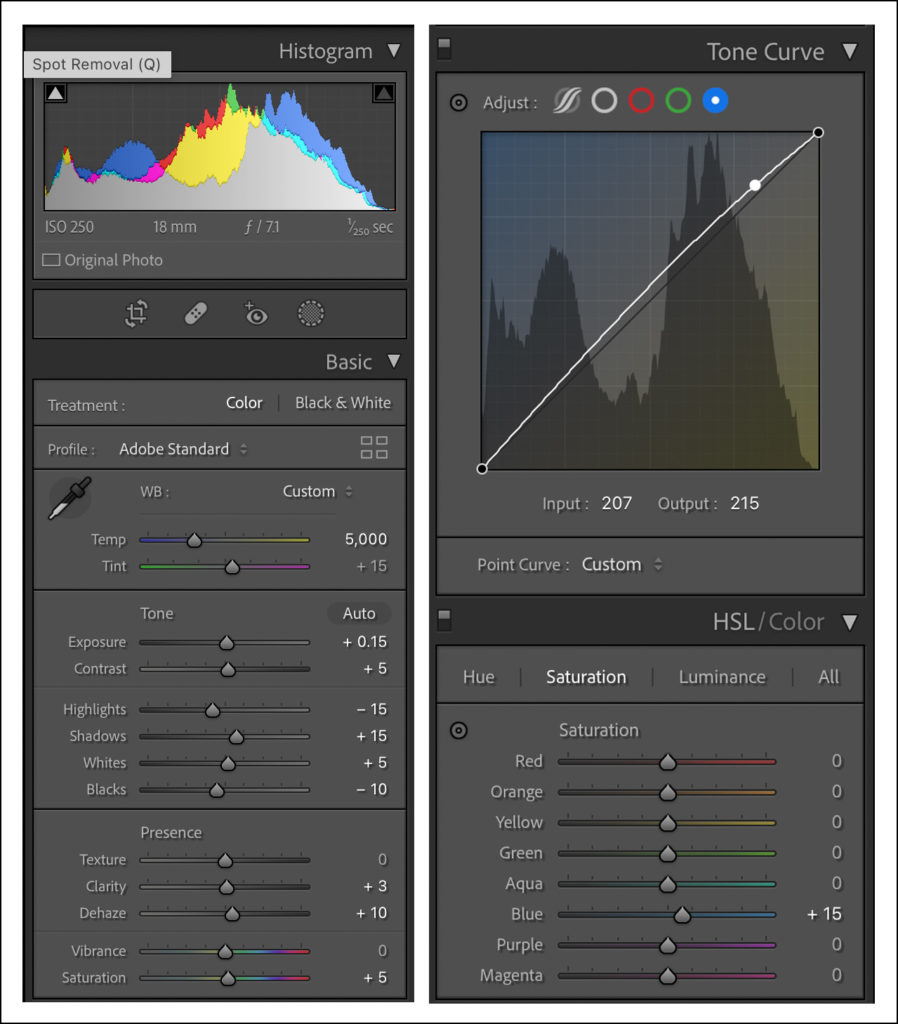
The first step in my series of B&W image editing techniques is to make a few choice adjustments in Lightroom.First of all I make whatever slight exposure adjustment might be needed to give me a nice “fat” histogram.In a well-exposed image your histogram should be shaped like a bell curve.There should be no “spikes”; especially on the highlight (right side) end of the graph.
You’ll note I added a little contrast (+5), crushed the highlights a bit (-15) and opened up the shadows a touch (+15).I added a bit more contrast by giving the whites a +5 boost and giving the blacks a -10 tweak.Then I made the sky a little bit deeper blue by bumping the tone curve on the blue channel and adding a bit (+15) blue saturation in the HSL palette.Yes, the final image will be rendered in B&W, but I want the blue sky to be dark in the finished B&W image.Thus the adjustments to the blue areas now.
Next Steps
That’s it.We’re all done in Lightroom.I don’t use ANY Lightroom presets.There is nothing any preset can do that you can’t do yourself.Get in there and experiment.Make your own presets and save them for future use.Chances are you’ll find that your personal style will always gravitate back to the adjustments YOU make that give your images the look YOU want.
Save yourself some money by making your own presets.Save the embarrassment of having your images look just like those of someone else who purchased the same preset pack that you did.Use the money you save to buy yourself that piece of gear you’re lusting over
Photoshop B&W Image Editing Techniques
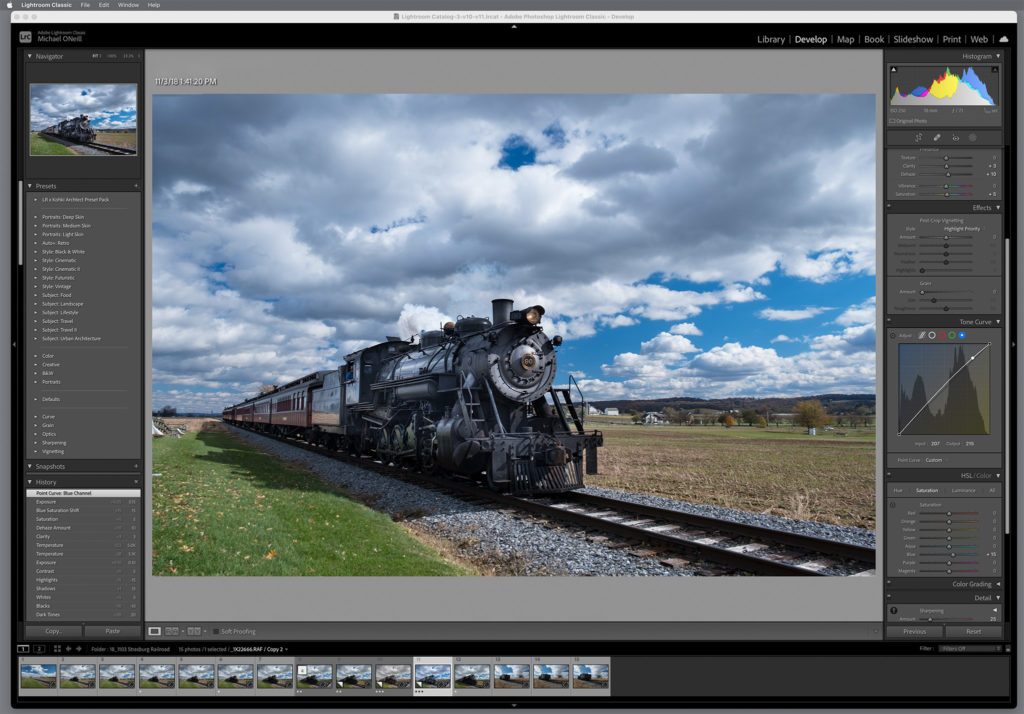
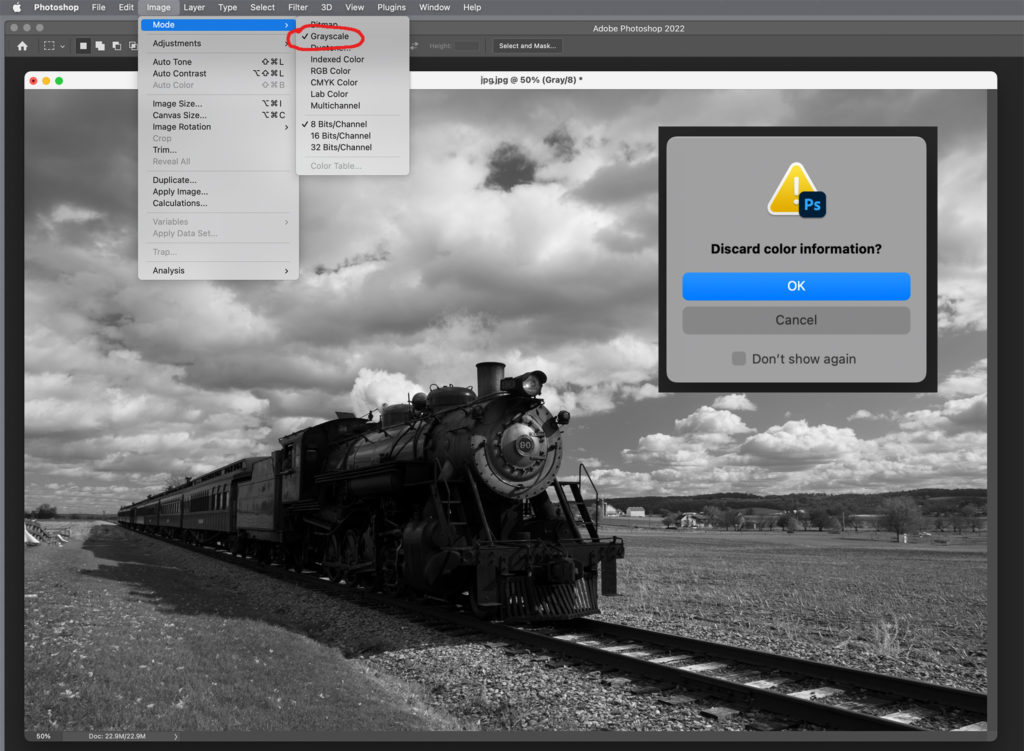
After exporting the image from Lightroom I open it in Adobe Photoshop.When my finished image is going to be a B&W image, the first thing I do is remove all the color information from the file.This is done by using the path Image > Mode > Grayscale.A pop up window will ask you if you really want to discard the color information.Click “OK”.
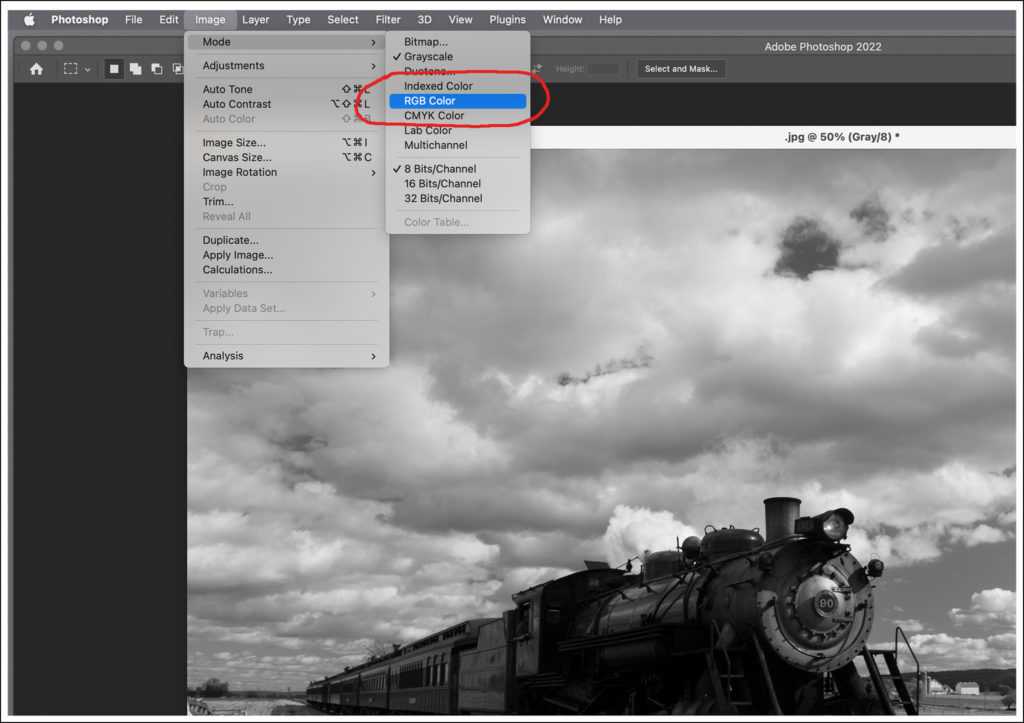
I will then convert the B&W image back into a color file by following the path Image > Mode > RGB Color.I now have a standard RGB file (Adobe or sRGB color space) that is absolutely void of color information.
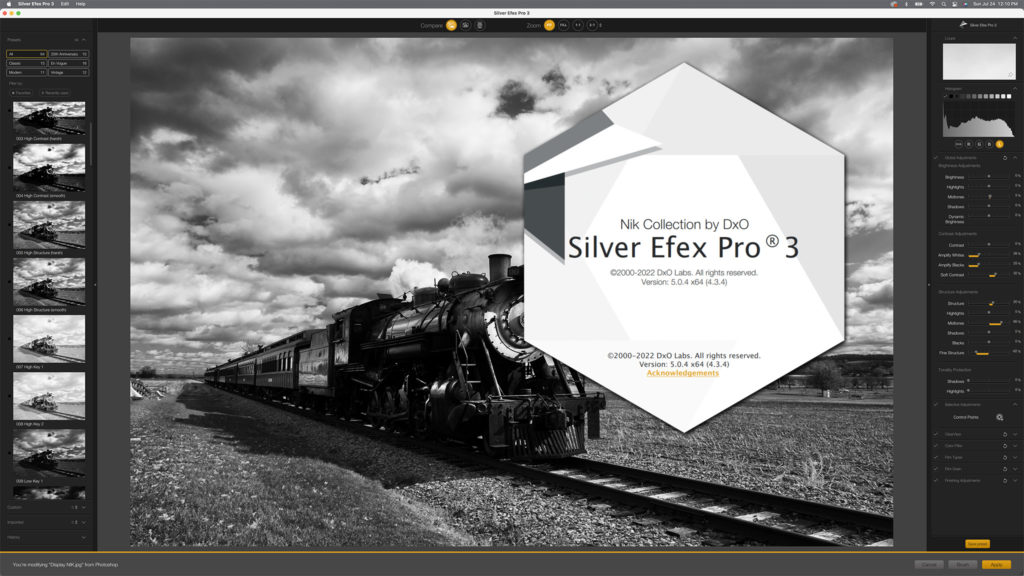
Powerful Tools Arrive In The NIK Of Time
One of the most powerful components in my B&W image editing techniques comes from The NIK Software Suite…in particular NIK Silver Efex Pro.Unlike most other presets the NIK software allows absolute 100% flexibility.The “presets” for B&W effects can be applied globally to an image.Using the NIK proprietary U-Point Technology you can apply effects to only a portion of an image, if that is your desire.
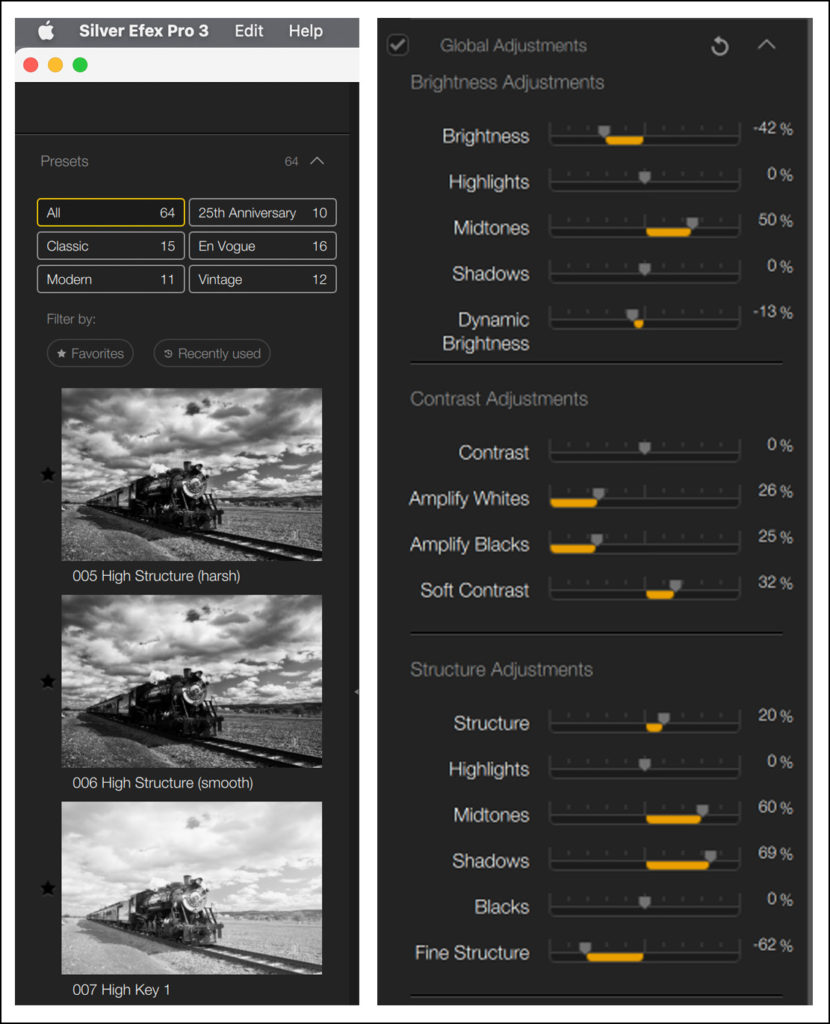
An extensive number of B&W parameters can be adjusted globally or locally using NIK Silver Efex Pro
Furthermore, the changes you make to the image are rendered as a new layer in Photoshop.By making that layer an adjustment layer and inverting it, you can “paint back in” the effect exactly where you want it.You can also adjust the opacity of the effect layer to get the exact amount of the preset effect that you desire.
It is for this reason that we went to the trouble of removing all of the color information from the file.You don’t want to dial back the opacity of your black and white effect to achieve your vision and reveal color information below.That would kind of destroys the whole B&W image thing, eh?
The Final Touches
Once you have your NIK B&W effect where you like it you can flatten the image in Photoshop.If you think you might want to go back later and tweak something, save the layered file as a .PSD file; then save a flattened copy in your working format (TIF, JPEG, Etc). Once you’re comfortable with this process you probably won’t bother saving layered .PSD files.You’ll know you’ve got what you were aiming for.
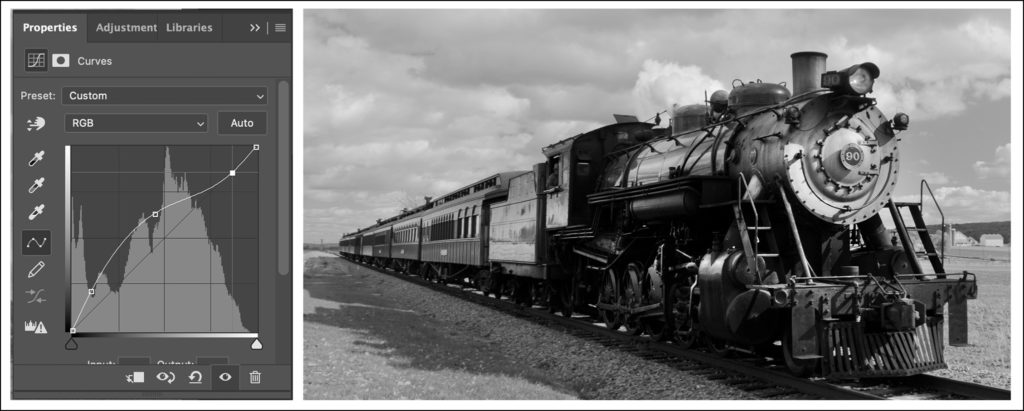
From here I create a curves adjustment layer and boost up those underexposed shadow areas.Invert the adjustment mask and use the brush tool to paint all that shadow detail back in where you need it.I told you it was there!
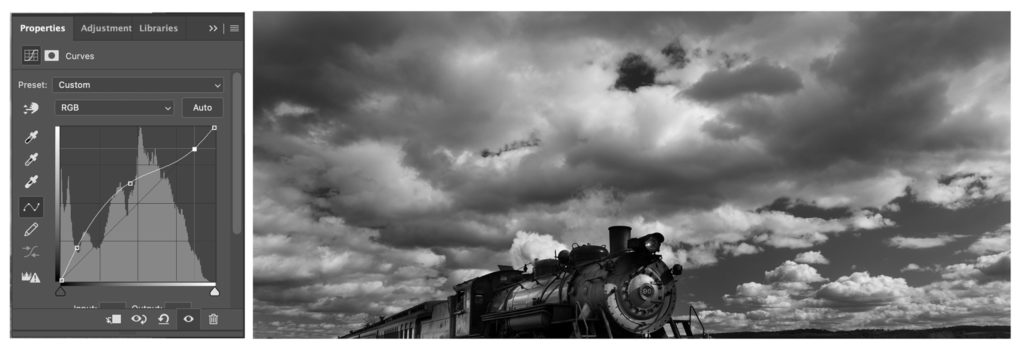
Flatten your image again and create another new curves adjustment layer.Modify the curve to create the rich dark sky with the bright white clouds.Of course this will destroy the appearance of the shadow areas we just enhanced.Again…invert the adjustment mask and paint just the sky back in.
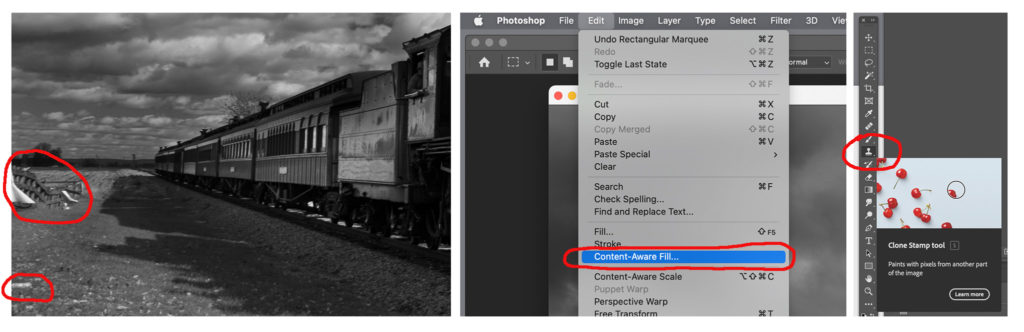
Finally use the selection tool and the Content-Aware Fill command and/or the clone tool to get rid of those distracting litter elements on the ground.Voila!You’re done.
B&W Image Editing Techniques Conclusion
I tried to be as descriptive as possible in outlining the steps in this process as well as the reasons you’re taking them.Truth-be-told, the actual total time it takes to employ all these steps will amount to a little over three minutes once you’ve got the routine down.I made it sound like a lot of work but it really isn’t.The results, I believe, are worth it and speaks for itself.
We hope you enjoyed this B&W image editing techniques tutorial.Above all we hope that you’ll put the lessons learned to good use in creating dramatic B&W images of your own.Be sure to subscribe to Roadcraft USA for notifications when new features are published.As always we welcome your comments below.
Please help support the Roadcraft USA online resource by making product purchases through the links in this post.As Amazon Associates we earn commissions from qualifying purchases made through these links.There is no additional cost to you whatsoever.Thank you for your support!
Click Here to view an interactive visual index page where you can quickly browse through all of the great features that are published on the Roadcraft USA blog.
2 thoughts on “STRASBURG RAILROAD ENGINE 90 • HOW I GOT THE SHOT”
Hi Tim…(and anyone else who viewed this tutorial that may be confused) Our apologies to those who may not have understood how we implement the NIK software. We probably should have said that we don’t use the kind of “one click fits all” kind of presets that most amateur photographers are predisposed to implement when ‘editing’ their images. We use the NIK software solely to gain access to its 15 different available adjustments under the brightness, contrast and structure parameters. A screen shot of those adjustments was in the tutorial. These adjustments (which can be applied globally -or- using NIK’s proprietary U-Point technology -or- used in adjustment masks in Photoshop) are not available in any other post processing application. We understand that the tutorial is quite complex. Most of our photography followers are seasoned professionals and understood the premise of using the software simply to create adjustment layer masks; which then can be UNIQUELY modified to create the final image envisioned. If anyone following this thread has questions regarding this professional technique we would be more than happy to respond to them. Again…our apologies if we did not spell out the technique in a matter that photographers of all skill levels could comprehend. Our bad.


Never use a preset, ever, except for NIX. DUDE??
Hi Tim…(and anyone else who viewed this tutorial that may be confused) Our apologies to those who may not have understood how we implement the NIK software. We probably should have said that we don’t use the kind of “one click fits all” kind of presets that most amateur photographers are predisposed to implement when ‘editing’ their images. We use the NIK software solely to gain access to its 15 different available adjustments under the brightness, contrast and structure parameters. A screen shot of those adjustments was in the tutorial. These adjustments (which can be applied globally -or- using NIK’s proprietary U-Point technology -or- used in adjustment masks in Photoshop) are not available in any other post processing application. We understand that the tutorial is quite complex. Most of our photography followers are seasoned professionals and understood the premise of using the software simply to create adjustment layer masks; which then can be UNIQUELY modified to create the final image envisioned. If anyone following this thread has questions regarding this professional technique we would be more than happy to respond to them. Again…our apologies if we did not spell out the technique in a matter that photographers of all skill levels could comprehend. Our bad.